Training and support
Getting started with CERP on Android
Installing and setting up CERP on Android
From downloading and installing the apps to activating the device, configuring keyboards and speeding up work with Bayamax barcode scanners.
Training videos and Windows installation
After installing, watch the videos on working with the software on the training page. A separate guide is available for setting up on a computer.
1. Download these five files
On the Android device, download the files below from the links provided. All five are APK files and must be opened on the device to install them.
- Stimuldroid
Download Stimuldroid
https://f.cerp.ir/sti/com.yasna.stimuldroid.apk - CerpServer
Download CerpServer
https://f.cerp.ir/cerpserver/com.yasna.cerpserver.apk - CerpDroid
Download CerpDroid
https://f.cerp.ir/cerpdroid/app-release.apk - Yasna Support (YasnaSupport)
Download Yasna Support (YasnaSupport)
https://f.cerp.ir/sc/android.apk - PostgresDroid
Download PostgresDroid
https://f.cerp.ir/postgresdroid/postgres.apk
2. Install the files from the Files app
When the downloads finish, open the device’s Files / File manager app and go to the Downloads folder. Tap each APK file and follow its installation steps.
If opening the file from Chrome does not start the installation, run the same downloaded file from the Files app. If Android asks for permission to install from this app, enable “Install unknown apps” for that file manager and return to the installation. Where this option lives depends on the Android version and device model.
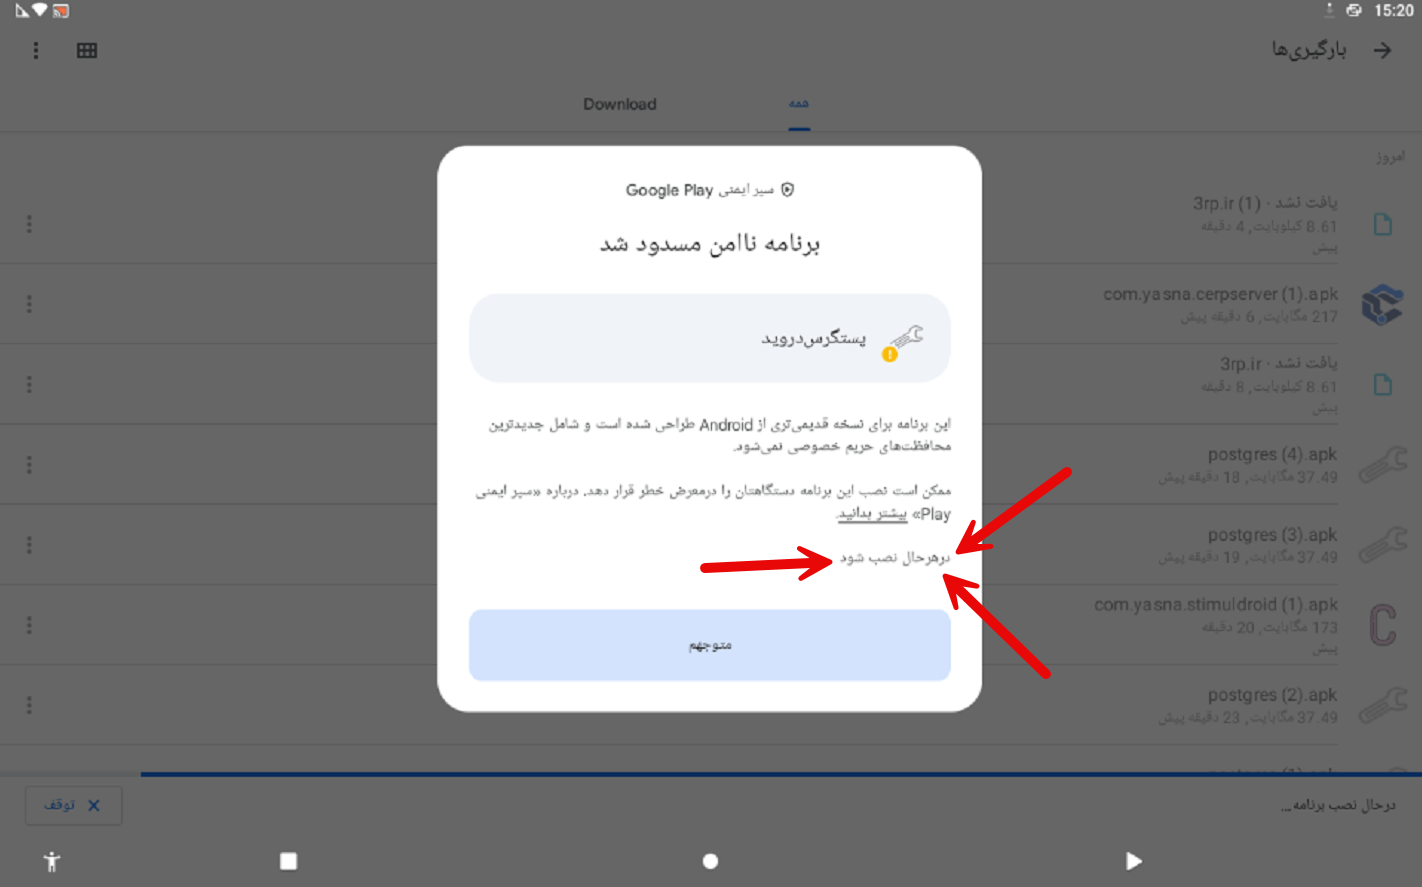
Important: the “Install anyway” option
If, while installing these files, you see an “Unsafe app blocked” message saying, as in the image below, that the app was built for an older version of Android, tap Install anyway to continue installing the version supplied by your reseller; the red arrow in the image shows where the option is.
This step applies to the warning shown in this image. If the warning text is different, or the file came from another link, check the message with your reseller.
Complete the installation for the remaining files as well.
3. Open CerpServer and activate the device
After installing, open the CerpServer app. Send the unique device ID shown in the app to your reseller so they can activate it.
Once your reseller confirms the activation, go to the Settings tab in CerpServer and choose Input Language Setting to open Android’s input method settings.
4. Configure the required keyboards
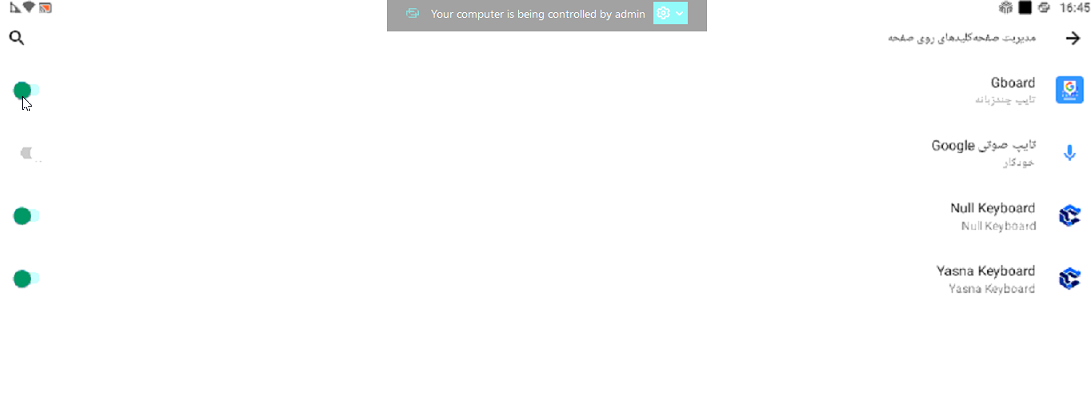
On the keyboard management screen, match the option names with the image below and make these changes:
- Turn off Google’s keyboard, Gboard.
- Turn on Null Keyboard.
- Turn on Yasna Keyboard.
The image below shows where the options are; the target state is Gboard off and both Null Keyboard and Yasna Keyboard on.
Accept the confirmation prompts as shown
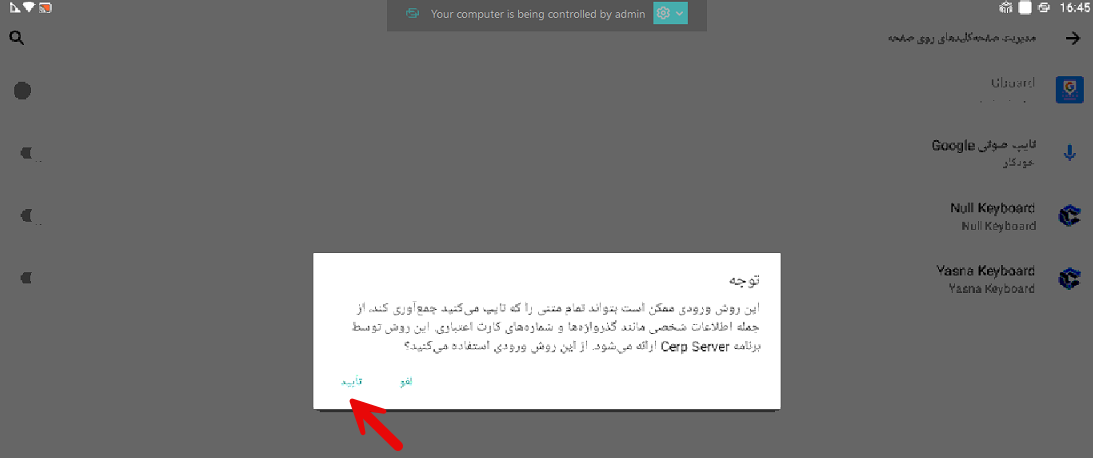
When you enable a keyboard, Android shows an input method confirmation. Check the app name and tap OK, as in the third image, to enable the installed keyboards.
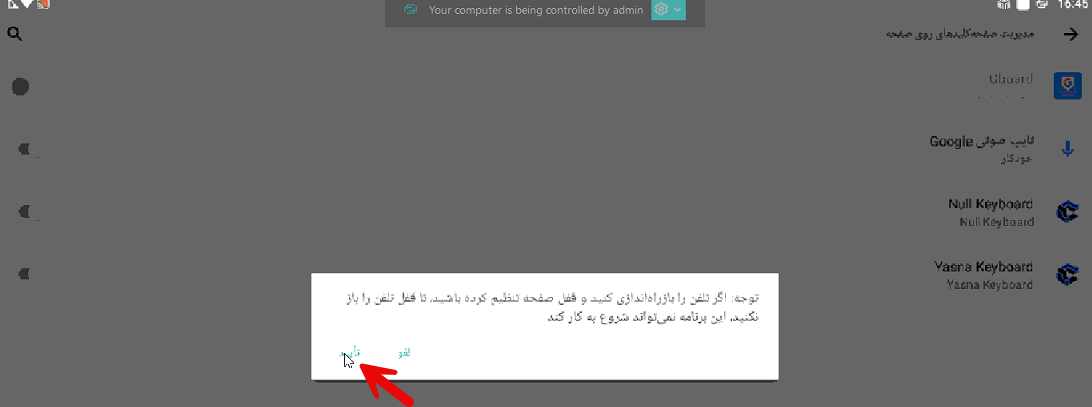
If a second message appears about using the input method after the device is unlocked, accept it too by tapping OK, as in the fourth image.
Switching keyboards and using the floating keyboard
From now on you can switch keyboards by pressing and holding the keyboard icon. With Null Keyboard, the system’s default keyboard does not open on screen and does not take up the software’s working area.
Whenever you need to type something by hand, tap the floating keyboard icon once to open the floating keyboard. It takes up less of the screen so more of the software stays visible.
5. Set up Bayamax barcode scanners for faster work
If your device has a Bayamax barcode scanner, go to Organisation settings → the Android-specific tab in the software.
OPOS mode: scan without focusing the barcode field
In this section, switch the barcode scanner to OPOS mode. In this mode the software does not need to be focused on the barcode field to receive a barcode, so there are fewer steps and barcodes are captured faster.
Continuous scanning: no need to hold the trigger
In the same section you can also enable continuous scanning so the scanner is always ready. You no longer need to hold the trigger button on the scanner, which speeds up repetitive work.
After changing the settings, scan a sample barcode and check that the software receives it correctly. Whether these options are available depends on the scanner model and the installed version of the software.
Setup complete — if you need help
Finally, check that the apps are installed, CerpServer is activated and the keyboards are set correctly. For remote assistance, follow the steps in the Android support article.
Android remote support with YasnaSupport
This installation, activation and configuration guide is based on the steps and images provided by the CERP team. The explanation of Android install permissions and the difference between warnings follows the official Google Play Protect guidance.